ここでは、Mikrotikルータ(routerboard)でルータ等の死活監視をして、メールにて通知をする方法をご紹介します。
監視方法は何パターンかありますが、ここでは2パターン紹介します。
-
監視先をテキストファイルにて管理して監視する方法
①監視先ファイルの作成
以下の状態のファイルを作成して「ping.txt」で保存して、Filesへアップロードします。
※,(カンマ)の左側がサーバのアドレスで右側がサーバの名前等を入力します。
192.168.100.1,router1
192.168.100.2,router2
192.168.100.3,router3
192.168.100.4,router4
②メール送信のための設定(SMTP AUTHで送信の場合)
以下のコマンドをターミナルへ入力して、設定します。
※SMTPサーバ名、メール差出人、SMTP認証パスワード、SMTP認証アカウント
/tool e-mail
set address=●SMTPサーバ名● from=●メールの差出人● password=SMTP認証パスワード\
port=587 start-tls=yes user=SMTP
※WinBoxからも設定可能です。
③メール送信のための設定(SMTP AUTHで送信の場合)
以下のコマンドをターミナルへ入力して、設定します。
※SMTPサーバ名、メール差出人、SMTP認証パスワード、SMTP認証アカウント
/tool e-mail
set address=●SMTPサーバ名● from=●メールの差出人● password=SMTP認証パスワード\
port=587 start-tls=yes user=SMTP認証アカウント
※WinBoxからも設定可能です。
④スクリプトの追加
以下のコマンドをターミナルへ入力して、設定します。(WinBoxからも可能)
/system script
add dont-require-permissions=no name=ping-kansi owner=admin policy=\
ftp,reboot,read,write,policy,test,password,sniff,sensitive,romon source=":\
if ([:len [/file find name=ping.txt]] < 1) do={\r\
\n:log warning \"FILE NOT FOUND\";\r\
\n:local ADMINMAIL1 \"メール送信先\"\r\
\n/tool e-mail send to=\$ADMINMAIL1 subject=\"FILE NOT FOUND\" body=\"FILE\
\_NOT FOUND\";\r\
\nexit\r\
\n}\r\
\n:global content [/file get [/file find name=ping.txt] contents] ;\r\
\n:global contentLen [ :len \$content ] ;\r\
\n:set contentLen (\$contentLen -2);\r\
\n:global lineEnd 0;\r\
\n:global line \"\";\r\
\n:global lastEnd 0;\r\
\n\r\
\n\r\
\n:do {\r\
\n :set lineEnd [:find \$content \"\\r\\n\" \$lastEnd ] ;\r\
\n :set line [:pick \$content \$lastEnd \$lineEnd] ;\r\
\n :set lastEnd ( \$lineEnd + 2 ) ;\r\
\n\r\
\n :local tmpArray [:toarray \$line] ;\r\
\n\t:if ( [:pick \$tmpArray 0] != \"\" ) do={\r\
\n\t:put \$tmpArray;\r\
\n:if ([/ping [:pick \$tmpArray 0] count=5] = 0) do={ \r\
\n:log warning \"PING NG \$[:pick \$tmpArray 1] \";\r\
\n/tool e-mail send to=\$ADMINMAIL1 subject=\"VPN PING NG\" body=\"PING NG\
\_\$[:pick \$tmpArray 1] \$[:pick \$tmpArray 0] \";\r\
\n\r\
\n}\r\
\n\r\
\n}\r\
\n} while (\$lineEnd < \$contentLen)\r\
\n"
④スケジュールの追加
以下のコマンドをターミナルへ入力して、設定します。(WinBoxからも可能)
※このスケジュール設定では、1時間おきに、③のスクリプトが実行されます。
/system scheduler
add interval=1h name=ping-kansi on-event=ping-kansi policy=\
ftp,reboot,read,write,policy,test,password,sniff,sensitive,romon \
start-date=jul/18/2019 start-time=07:00:00
-
ToolsのNetwatch機能を使い監視
この設定では、Netwatchの監視機能を使用して、PING先の状態が変化(切断・復旧)した際、メールを送信する設定を行います。(本設定はWinBoxで行います。コマンドも可能)
①メール送信のための設定(SMTP AUTHで送信の場合)
以下のコマンドをターミナルへ入力して、設定します。
※SMTPサーバ名、メール差出人、SMTP認証パスワード、SMTP認証アカウント
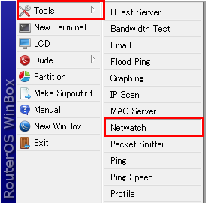
②Tools - Netwatchを開きます。

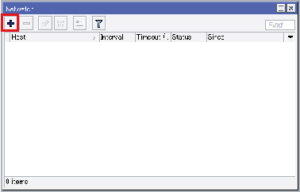
②「Netwatch」の画面が表示されましたら、「+」をクリックして、新規追加します。

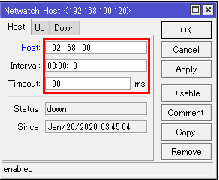
③設定画面が表示されましたら、以下の通り入力します。
Host:監視先IPアドレス(ドメインを入力すると自動的にIPアドレスに変換されます。
Interval:監視間隔(デフォルトは1秒)
Timeout:PINGのタイムアウト時間(短くすると、すぐにDOWNとなるため注意)

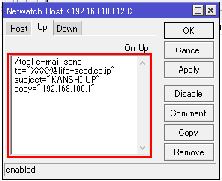
④上の設定情報を入力しましたら、「Up」タブをクリックして、Up時のメール送信スクリプトを入力します。
/tool e-mail send to="送信先メールアドレス" subject="件名" body="本文";

⑤上の設定情報を入力しましたら、「Down」タブをクリックして、Down時のメール送信スクリプトを入力します。
/tool e-mail send to="送信先メールアドレス" subject="件名" body="本文";

⑥以上で設定完了です。(②~⑤の設定は以下コマンドのみで設定する事も可能です)
/tool netwatch
add disabled=yes down-script=":local ADMINMAIL1 \"メール送信先\"\r\
    \n/tool e-mail send to=\$ADMINMAIL1 subject=\"FILE FOUND\" body=\"FILE FOU\
    ND\";\r\
    \n" host=192.168.100.120 interval=10s timeout=100ms up-script=":local ADMI\
    NMAIL1 \"メール送信先\"\r\
    \n/tool e-mail send to=\$ADMINMAIL1 subject=\"FILE NOT FOUND\" body=\"FILE\
    \_NOT FOUND\";\r\
    \n"
以上で、監視設定は完了となります。よろしければ、お試しください。
ご不明な点等ございましたら、ライフシードまでお問い合わせください。
